Cameras
Attaching/Detaching cameras client-side
You can detach the player camera to move and rotate it.
GAME.CAMERA.detach();
GAME.CAMERA.attach();
2
Moving/Rotating cameras client-side
WARNING
Only once the camera is detached, you can also rotate or position it
# Move camera
GAME.CAMERA.move(
    0,   # num x position
    0,   # num y position
    0    # num z position
);

# Rotate camera
GAME.CAMERA.rotate(
    0,   # num x rotation
    0,   # num y rotation
    0    # num z rotation
);

# Make camera look at coordinates
GAME.CAMERA.lookAt(
    0,   # num x position
    0,   # num y position
    0    # num z position
);
2
3
4
5
6
7
8
9
10
11
12
13
14
15
16
17
18
19
20
Camera methods client-side
# Field of view
GAME.CAMERA.fov(90); # num (10-170)

# Shake the camera
GAME.CAMERA.shake(0.9); # num (0 - 1)
2
3
4
5
Custom assets
3D models client-side
Tags: asset, custom
TIP
Currently only .obj and .gltf are supported for 3d models
You can import and manage 3d models inside of krunker using KrunkScript.
# Add an asset to the scene.
GAME.SCENE.addAsset(
    "236t",         # str 3d asset id
    5,              # num x position
    0,              # num y position
    5,              # num z position
    1,              # num scale
    "#FFF",         # str color
    {},             # obj additional data
    onObjectLoad    # action callback when asset loads. (function name is function used for callback)
);
2
3
4
5
6
7
8
9
10
11
Textures & images client-side
TIP
Currently only .png images are supported
# Create an object reference and change its texture id.
obj cube = GAME.SCENE.addCube("", "#fff", 0, 0, 0, 10, 10, 10);
cube.texture = "28000";
2
3
Animations client-side
Default animations client-side
Tags: clips
The krunker playermodels has some player animations by default.
- Idle: Loops while player is idle
- Move: Loops while player is moving
- Crouch: Loops while player is crouched
- Jump: Plays when player jumps
- Melee: Plays when player melees
- Shoot: Plays when player shoots
Custom animations client-side
TIP
Only gltf's support animations
# Create a 3d asset object
obj object = GAME.SCENE.addAsset("11441g", 0, 0, 0, 1);

# Play animation on object
object.playAnim(
	"Jump",             # str clip name
	1                   # num repetitions (0 = infinite loop)
);

# You can also do this on players and AI
player.playAnim("Jump");
aiBot.playAnim("Jump");

# Stop object animation
object.stopAnim();
2
3
4
5
6
7
8
9
10
11
12
13
14
15
# Playing an animation thru GAME method
obj object = GAME.SCENE.addAsset("11441g", 0, 0, 0, 1);

# Play animation
GAME.ANIM.playClip(object, "Jump", 0);

# Stop animation
GAME.ANIM.stopClip(object, "Jump");
2
3
4
5
6
7
8
Sounds & music client-side
Tags: audio
TIP
The sound asset id parameter will automatically convert str's to num's as of update 5.5.0
# Play sound in 2D space
obj sound = GAME.SOUND.play2D(
    0,      # num sound asset id
    1,      # num volume (0 - 1)
    1,      # num rate (0 - 1)
    true    # bool looping
);
2
3
4
5
6
7
# Play sound in 3D space
obj sound = GAME.SOUND.play3D(
    37204,  # num sound asset id
    1,      # num volume (0 - 1)
    5,      # num x position
    0,      # num y position
    5,      # num z position
    0.9,    # num rate (0 - 1)
    true    # bool looping
);
2
3
4
5
6
7
8
9
10
# Alter rate & volume
sound.rate = 0.5;
sound.volume = 0.2;

# Mute, unmute, play, stop & pause
sound.mute();
sound.unmute();
sound.play();
sound.stop();
sound.pause();

# Fade
sound.fade(
    0.9,    # num volume start (0 - 1)
    0.1,    # num volume end (0 - 1)
    0       # num duration
);
2
3
4
5
6
7
8
9
10
11
12
13
14
15
16
17
Data storage
Database server-side
Tags: database
Databases allow you to store variables permanently, without being able to be modified by others. Its useful for keeping track of currencies, personal best scores and what items a player owns.
TIP
To delete data storage values you can use delete all as a key
WARNING
- Make sure to use player.accountName (server-side only) instead of player.username
- You can only store and access data from players who are active in game
- set, update, transact every 10 seconds per connection/player
- load every 5 seconds per connection/player
- 30 Keys per map, keys length is 20 characters. (Object properties are treated as unique database keys)
Set storage server-side
# Set a player value to a specific value
GAME.STORAGE.set(
    "SwatDoge",                     # str accountName
    {kills: 300, nick: "Swat"},     # obj data
    true,                           # bool private (false: private, true: public) Public databases can be accessed by others
    callback                        # action(obj data, bool success, str accountName) callback function
);
2
3
4
5
6
7
Update storage server-side
# Updating ADDS the value you give it to the existing value. Negative values will thus be subtracted.
# Removing 5 kills from SwatDoge's kills
GAME.STORAGE.update(
    "SwatDoge",    # str accountName
    {kills: -5},   # obj data
    true,          # bool private (false: private, true: public) Public databases can be accessed by others
    callback       # action(obj data, bool success, str accountName) callback function
);
2
3
4
5
6
7
8
Transact storage server-side
# The same as GAME.STORAGE.update but you can not go below 0. If this does happen, the success parameter on the callback function will be false
GAME.STORAGE.transact(
    "SwatDoge",   # str accountName
    {kills: -5},  # obj data
    true,         # bool private (false: private, true: public) Public databases can be accessed by others
    callback      # action(obj data, bool success, str accountName) callback function
);
2
3
4
5
6
7
Loading Data server-side
WARNING
Loading from an empty database will result in an error message "No data" and not call the callback
# Load data you stored on your map
GAME.STORAGE.load(
    "SwatDoge",     # str accountName
    "",             # str name of game with public database. (leave empty)
    callback        # action(obj data, bool success, str accountName) callback function
);
2
3
4
5
6
# Load data you stored on another map
GAME.STORAGE.load(
    "SwatDoge",     # str accountName
    "lava_run",     # str name of game with public database. (leave empty)
    callback        # action(obj data, bool success, str accountName) callback function
);
2
3
4
5
6
Cookies client-side
Tags: localstorage
Cookies allow you to store variables on a users browser. These variables can be modified by users and should not be relied on for source of truth. Useful for settings.
WARNING
Cookies can only store strings as values
# Save cookie
GAME.COOKIES.save(
    "test",   # str name
    "100"     # str data
);
2
3
4
5
# Load cookie
str value = GAME.COOKIES.load(
    "test"   # str name
);
2
3
4
# Delete cookie
GAME.COOKIES.remove(
    "test"   # str name
);
2
3
4
# Check if cookie exists
GAME.COOKIES.has(
    "test"    # str name
);
2
3
4
Game logic
Order of execution client-side server-side
- Game Loop: Timed loop to update the world.
- Game Elements: Objects and Components in your game.
- Inputs/Controls: User-actions & inputs.
- Feedback: Response to user-actions & inputs applied to elements.
- Rendering: Visual representation of game elements.
Timing server-side client-side
WARNING
- You can only freeze time on the server side
- GAME.TIME.fixedDelta() does not work
- GAME.TIME.now() is based on system time. Its recommended to sync with server time
# Get current time in unix
num time = GAME.TIME.now();

# Delta gives you the miliseconds between updates
public action update(delta) {

    # Moving a cube at a consistent speed, regardless of framerate
	(num) object.x += ((num) object.speed * delta);
}

# Freeze or unfreeze game timer
GAME.TIME.freeze();
GAME.TIME.unfreeze();

# Get delta unaffected by game speed
GAME.TIME.fixedDelta();
2
3
4
5
6
7
8
9
10
11
12
13
14
15
16
Players server-side client-side
TIP
GAME.PLAYERS.findByID() and GAME.PLAYERS.list() do not return references but instances
# Get own player object (client-side)
obj self = GAME.PLAYERS.getSelf();

# Get a player by their id
obj player = GAME.PLAYERS.findByID(
    id # str player id
);

# Access player list
obj[] players = GAME.PLAYERS.list();

# If player does not exist.
if (notEmpty player && !player) {
    GAME.log("Player does not exist.");
}
2
3
4
5
6
7
8
9
10
11
12
13
14
15
You can change/access player values like with any other objects:
TIP
You can get the full player object here
WARNING
- player.assetID requires
player typeinclass config > player assetto be set tomodel
player.position.x = 10;        # num set x pos
player.rotation.x = 0.3;       # num set x direction
player.velocity.x = 0.1;       # num set x velocity

player.sid;                    # num short id
player.id;                     # str id
player.username;               # str username (can be set using krunker premium)
player.accountName;            # str account name (actual name)
player.accountID;              # str profile id

player.health = 10;            # num health
player.score = 5;              # num score (server-side)
player.visible = false;        # bool visible
player.team;                   # num team (read-only)
player.ammo;                   # num ammo count (read-only)

player.classIndex;             # num returns class ID
player.loadoutIndex;           # num weapon slot ID

player.defaultMovement = false;     # bool disables player movement
player.defaultVelocity = false;     # bool disables player velocity (client & server)
player.defaultRotation = false;     # bool disables player rotations (client & server)
player.disableShooting = true;      # bool disables shooting & reloading (client & server)
player.disableMelee = true;         # bool disables melee (client & server)

player.active;                 # bool spawned in (not when spectator/dead)
player.onWall;                 # bool touching a wall
player.onGround;               # bool touching the ground
player.onTerrain;              # bool touching terrain
player.isCrouching;            # bool is crouching
player.isYou;                  # bool player reference is self (client-side)
player.assetID = "325253";     # update player model
2
3
4
5
6
7
8
9
10
11
12
13
14
15
16
17
18
19
20
21
22
23
24
25
26
27
28
29
30
31
32
Modifying loadout slots
TIP
You can use the krunker weapon id's list to find the right ID for your weapon
WARNING
- You can only change on server side
- Clearing the melee slot seems to not work at the moment
- You can only give/change weapons to their designated slot (pistol = secondary only, ak = primary only)
# void clear loadout of player
player.clearLoadout();

# void change primary item from player
player.changePrimary(
    0 # weapon id
);

# void change secondary item from player
player.changeSecondary(
    0 # weapon id
);

# void give player weapon
player.giveWeapon(
    0 # weapon id
);
2
3
4
5
6
7
8
9
10
11
12
13
14
15
16
17
# void remove melee item from player
player.removeMelee();

# void remove primary item from player
player.removePrimary();

# void remove secondary item from player
player.removeSecondary();
2
3
4
5
6
7
8
AIs & NPCs server-side
WARNING
You are currently limited to 40 active AIs per game
# Create AI reference
obj AI = GAME.AI.spawn(
    "11441g",   # str asset id
    "AI 1",     # str name
    0,          # num x position
    0,          # num y position
    0,          # num z position
    {}          # obj additional data
);
2
3
4
5
6
7
8
9
# Additional data for the AI
obj data = {
    animStart: "Idle", # str active animation name
    animSpeed: 0.5,    # num animation speed (0 - 1)

    health: 100,       # num ai health value

    speed: 1.0,        # num speed
    turnSpeed: 1.0,    # num turn speed
    gravity: 1.0,      # num gravity

    respawnT: 1000,    # num respawn time (miliseconds)
    respawnR: false,   # bool respawn random time

    targAI: false,     # bool target other AI
    targPlr: false,    # bool target players
    visionDis: 120,    # num vision distance
    chaseDis: 20,      # num chase distance

    canMelee: false,   # bool can melee
    meleeRate: 500,    # num melee rate (miliseconds)
    meleeRange: 500,   # num melee range
    meleeDmg: 500,     # num melee dmg
    canShoot: false,   # bool can shoot
    fireRate: 500,     # num firerate (miliseconds)

    roamRadius: 0,     # num roam radius
    roamTime: 0,       # num roam time
    shotSpread: 0,     # num shot spread
    shotBreak: 0,      # num shot break
    behaviorType: 0,   # num behavior type
    score: 0,          # num score

    modelScale: 10,    # num model scale
    modelOffsetY: 0,   # num model y-offset
    modelRotation: 0,  # num model rotation offset
    hitBotW: 1,        # num hitbox width
    hitBoxH: 1         # num hitbox height
};
2
3
4
5
6
7
8
9
10
11
12
13
14
15
16
17
18
19
20
21
22
23
24
25
26
27
28
29
30
31
32
33
34
35
36
37
38
39
# Delete AI
GAME.AI.remove(testBot.sid);

# List AI
obj[] AIs = GAME.AI.list();

testBot.displayName = "test";   # str name
testBot.health = 10;            # num health
testBot.position.x = 10;        # num position x
testBot.rotation.x = Math.PI;   # num rotation x
testBot.behaviour = 1;          # num (0: disabled 1: default)
testBot.pathIndex = 5;          # num pathnodes
2
3
4
5
6
7
8
9
10
11
12
Movement client-side server-side
WARNING
Movement restrictions get reset on respawn
# Disable default movement behaviour
player.defaultMovement = false;

# Disable specific input
player.disableDefault("jump");

# Inputs get disabled within the "onPlayerUpdate" hook, which has the following controlls:
inputs.mouseY;          #num mouse y direction
inputs.mouseX;          #num mouse x direction
inputs.movDir;          #num W, A, S, D inputs converted to direction in radians

inputs.lMouse;          #bool left mouse
inputs.rMouse;          #bool right mouse
inputs.jump;            #bool jump key
inputs.reload;          #bool reload key
inputs.crouch;          #bool crouch key
inputs.scroll;          #bool scroll wheel delta
inputs.swap;            #bool swap keys
inputs.restK;           #bool parkour reset key
inputs.inter;           #bool interact key
2
3
4
5
6
7
8
9
10
11
12
13
14
15
16
17
18
19
20
Inputs
Keyboard Inputs client-side
TIP
- Must be used inside update loop
- Uses javascript keycodes: https://keycode.info/
WARNING
GAME.INPUTS.keyDown seems to be broken currently
# Do something when "c" (key code 67) is held down
public action update(num delta) {
    if (GAME.INPUTS.keyDown(67)) {
        # do something
    };
}
2
3
4
5
6
Mouse Position client-side
WARNING
GAME.INPUTS.mousePos() does not work currently
# Get mouse position
obj mousePosition = GAME.INPUTS.mousePos();

# Draw a red circle at the position of the mouse
GAME.OVERLAY.drawCircle((num) mousePosition.x, (num) mousePosition.y, 10, 10, 0, "#ff0000");
2
3
4
5
Mouse Movement client-side
# Get mouse movement vector
obj pos = GAME.INPUTS.mouseMovement();
2
Unlock Mouse client-side
# Unlock mouse
GAME.INPUTS.unlockMouse();

# Unlock mouse entirely, unfocussing the window
GAME.INPUTS.freeMouse();
2
3
4
5
Input Listeners client-side
# Mouse click
public action onMouseClick(num button, num x, num y) {
    # num button    - mouse click button id (1: left mouse, 2: middle mouse, 3: right mouse, 4+: mouse macro's)
    # num x         - x position of mouse
    # num y         - y position of mouse
}
2
3
4
5
6
# After mouse click
public action onMouseUp(num button, num x, num y) {
    # num button    - mouse click button id (1: left mouse, 2: middle mouse, 3: right mouse, 4+: mouse macro's)
    # num x         - x position of mouse
    # num y         - y position of mouse
}
2
3
4
5
6
# When mouse scrolls
public action onMouseScroll(num dir) {
	# num dir       - 1: scroll up, scroll left 2: scroll down, scroll right
}
2
3
4
# When key is being pressed
public action onKeyPress(str key, num code) {
    # str key        - key in text format. (space == " ")
    # num code       - code of key. (space == 32)
}
2
3
4
5
# After key was pressed
public action onKeyUp(str key, num code) {
    # str key        - key in text format. (space == " ")
    # num code       - code of key. (space == 32)
}
2
3
4
5
# When key is held
public action onKeyHeld(str key, num code) {
    # str key        - key in text format. (space == " ")
    # num code       - code of key. (space == 32)
}
2
3
4
5
Controller input listeners client-side
WARNING
- Input hooks have a very inconsistent
codeparameter, its recommended to use thekeyparameter instead
# Runs when a controller button gets pressed
public action onControllerPress(str key, num code) {
    #str key                - button in text format (dpad up == "dpad_up")
    #num code               - code of button (shoulder_bottom_left == 10003)
}
2
3
4
5
# Runs when a controller button was pressed
public action onControllerUp(str key, num code) {
    #str key                - button in text format (dpad up == "dpad_up")
    #num code               - code of button (shoulder_bottom_left == 10003)
}
2
3
4
5
# Runs when a controller button is being held
public action onControllerHeld(str key, num code) {
    #str key                - button in text format (dpad up == "dpad_up")
    #num code               - code of button (shoulder_bottom_left == 10003)
}
2
3
4
5
Mod/Resource packs
Loading/Unloading mods with KrunkScript client-side
TIP
GAME.MODS.Reset() foces a popup on your screen, which can be removed using:
GAME.UI.updateDIVText("popupHolder", "");
# Load mod by URL
GAME.MODS.load(
    # str mod URL
    "https://krunker-user-assets.nyc3.cdn.digitaloceanspaces.com/md42849/mod.zip"
);

# Reset/unload mods
GAME.MODS.reset();
2
3
4
5
6
7
8
Structure client-side
The default mod.zipopen in new window has the following structure.
- css: css files in here will be loaded into krunker
- fonts: fonts in here can be loaded in with css, using CSSFONT:name
- css-img: directory of images that can be loaded into css, using CSSIMAGE:name
- img: default krunker images that can be overwritten
- medals: krunker medal imagery
- models: default krunker models that can be overwritten
- weapons: weapon models
- attach: weapon attachment models
- body: body cosmetic models
- collectibles: item collectibles models
- faces: face cosmetic models
- hats: hat cosmetic models
- melee: melee cosmetic models
- pets: pet cosmetic models
- shoes: shoe cosmetic models
- sprays: spray cosmetic models
- waist: waist cosmetic models
- scares: jumpscare resources
- scripts: allows for scripts, like settings.txt which lets you change settings.
- shaders: json with vertex shaders
- sound: default krunker sounds
- textures: default krunker textures
- classes: class icon textures
- dots: weapon sight dot textures
- recticles: more weapon sight dot textures
- particles: particle textures
- pubs: billboard textures
- scopes: scope textures
- weapons: weapon textures
- attach: weapon attachment textures
- body: body cosmetic textures
- collectibles: item collectibles textures
- faces: face cosmetic textures
- hats: hat cosmetic textures
- melee: melee cosmetic textures
- pets: pet cosmetic textures
- shoes: shoe cosmetic textures
- sprays: spray cosmetic textures
- waist: waist cosmetic textures
- videos: videos used by krunker
Adding fonts and images to CSS client-side
You can not use links in KrunkScript for security reasons, but you can use a prefix to load in images and fonts.
TIP
- Images go into the
css-imgfolder - Fonts go into the
css/fonts/folder
WARNING
- Protected elements are non-modifyable elements, and will break your mod if modified with css. These elements could be KR count, ads, canvas elements and like/dislike buttons, etc
- Images only support png, every fonttype is supported
- You can not import any other resource then png's and fonts
.iconProfile {
    background-image: CSSIMAGE:profile; /* css-img/profile.png */
}

@font-face {
    font-family: "CustomFont";
    src: CSSFONT:font2; /* css/fonts/font2.ttf */
}

* {
    font-family: "CustomFont";  /*Make all text the custom font*/
}
2
3
4
5
6
7
8
9
10
11
12
Settings override client-side
In /scripts/settings.txt you can load player settings like shown below.
# settingname, value
shaderRendering, false
resolution, 0.6
shadows, true
softShad, false
highResShad, false
postProcessing, true
bloom, false
2
3
4
5
6
7
8
To view a full list of changeable settings, click hereopen in new window. These settings are reset once a player leaves your game.
Settings thru KrunkScript client-side
# Update setting
GAME.SETTINGS.set(
    "resolution",   # str setting name
    "2"             # str value
);
2
3
4
5
# Get setting value of player
GAME.SETTINGS.get(
    "resolution",   # str setting name
);
2
3
4
# Get str[] of all available settings
GAME.SETTINGS.list();
2
Latest mod.zip download
Download the latest mod.zip hereopen in new window
Multiplayer & networking
Networking allows you to send variables to the server, which can then send it back to other players, or store it in a database.
WARNING
Networking must be optimized at all costs
- Data: 2000 bytes per message
- Broadcast (server to all): 10 msg per second
- Send (server to client): 20 msg per second per user
- Send (client to server): 40 msg per second
- Message id string: 10 Characters
Sending data server-side client-side
First off you have to send your variable to either the server or the client, they will be able to listen for the variable so they can use it.
Sending is used for sending data to one specific user.
Broadcasting data server-side
Broadcasting allows you to send data to all connected clients.
# Send data to all clients
GAME.NETWORK.broadcast(
    "test",     # str message name
    {a: 1}      # obj data
);
2
3
4
5
Receiving data server-side client-side
Once the message has been sent, we can listen for it and use its given object.
Detect rate limiting server-side client-side
KrunkScript rate limits you to prevent spam over the network.
# Will return a "success" boolean, if false you are being rate limited
if (GAME.NETWORK.broadcast("hi there", {a: 1}) {
    # message was sent
}
else {
    # message rate limited
}
2
3
4
5
6
7
Sending & broadcasting chat messages server-side
You can send chat messages from the server.
WARNING
- Send: 2 msg per second
- Broadcast: 2 msg per second
# Send message to specific player
GAME.CHAT.send(
    player.id,      # str player id
    "hello world",  # str message
    "#FFF"          # str color
);
2
3
4
5
6
# Broadcast message to all players
GAME.CHAT.broadcast(
    "hello world",  # str message
    "#FFF"          # str color
);
2
3
4
5
Movement syncing client-side
Every second the server sends the players position to the client. Once that information arrives at the client, the client retraces its steps since that point in time to now, using the corrected information that it has received from the server.
If your movement code includes custom playervalues, those have to be registered, to be included in the sync.
TIP
Check out this example to add basic double jumping using server syncing
WARNING
- To sync a player property, the property must exist first (currently it gives a wrong error)
- Syncing objects is not yet possible
- Sync values can be up to 16 characters long
- You can have up to 20 sync variables at once per player
# Create player reference
obj players = GAME.players.getSelf();

# Set property
players.hasDoubleJump = true;

# Start syncing player value
player.registerSyncValues(
    "hasDoubleJump"     #str object key
);
2
3
4
5
6
7
8
9
10
# Stop syncing player value
player.unregisterSyncValues(
    "hasDoubleJump"     #str object key
);
2
3
4
Open a window to a different game or platform client-side
GAME.URLS.openDiscord(
    "YBnq2um"                            # str discord invite url
);
2
3
GAME.URLS.openOpensea(
    "https://opensea.io/SwatDoge"        # str openSea wallet url
);
2
3
GAME.URLS.openTwitter(
    "https://twitter.com/swatdoge"       # str twitter url
);
2
3
GAME.URLS.openYoutube(
    "https://www.youtube.com/channel/UCkQM8ePPA8me73585aLJvmw"       # str youtube url
);
2
3
GAME.changeGame(
    "DQ_Battleboats"                    # str game name
);
2
3
Getting host server-side
WARNING
You can only retrieve host player object if player is spawned in
# Get player object of host
obj player = GAME.CONFIG.getHost();
2
Platforms
Detect platform client-side
TIP
You can make your UI mobile compatable: Custom CSS phone compatability
GAME.PLATFORM.isMobile();       # bool client is on mobile
GAME.PLATFORM.isBrowser();      # bool client is on browsers
GAME.PLATFORM.isClient();       # bool client is on a client
2
3
2D Rendering
Overlay canvas client-side
Krunker has a 2d overlay called the canvas. It allows you to render shapes and text on top of a 2d overlay.
# Get dimensions of overlay obj{x, y}
GAME.OVERLAY.getSize();
2
# Move entire overlay
GAME.OVERLAY.offset(
    10,     # num x offset
    0       # num y offset
);
2
3
4
5
# Scale overlay
GAME.OVERLAY.scale(
    0.1     #num scale
);
2
3
4
# Get text width (num) on overlay based on font size
GAME.OVERLAY.measureText(
    10,     #num font size
    "Test", #str text
    "serif" #str font family name
);
2
3
4
5
6
# Clear overlay
GAME.OVERLAY.clear();
2
Render loop client-side
You can draw on the overlay using the render hook.
TIP
The render hook runs after the update hook, see order of execution
action render(num delta) {
    # Create a red triangle
    GAME.OVERLAY.drawRect(0, 0, 20, 15, 0, "#ff0000", 1);
}
2
3
4
2D shapes client-side
TIP
Canvas shapes start at the top left of your screen, setting position will offset it to the bottom right
Text
TIP
You can use a custom font-family from a mod for the canvas, as shown in the example below
WARNING
Keep in mind that default browser font families may differ for other browsers
# Draw text on screen
GAME.OVERLAY.drawText(
    "Hello world",  # str text
    0,              # num x position
    0,              # num y position
    0,              # num rotation (0 - 360)
    20,             # num font size
    "center",       # str alignment ("left", "center", "right")
    "#FFF",         # str color
    0.9,            # num opacity
    "comic sans"    # str font
);

# Get canvas text width
num textWidth = GAME.OVERLAY.measureText(
    24,         # num fontsize
    "Testing",  # str text
    "serif"     # str font family name
);
2
3
4
5
6
7
8
9
10
11
12
13
14
15
16
17
18
19
20
Rectangles
GAME.OVERLAY.drawRect(
    0,            # num x position
    0,            # num y position
    100,          # num width
    100,          # num height
    0,            # num rotation (0 - 360)
    "#FFF",       # str color
    0.9,          # num opacity (0 - 1)
    false         # bool center
);
2
3
4
5
6
7
8
9
10
Circles
GAME.OVERLAY.drawCircle(
    0,           # num x position
    0,           # num y position
    100,         # num width
    100,         # num height
    0,           # num rotation (0 - 360)
    "#FFF",      # str color
    0.9,         # num opacity (0 - 1)
    false        # bool center
);
2
3
4
5
6
7
8
9
10
Line
GAME.OVERLAY.drawLine(
    0,           # num x start position
    0,           # num y start position
    100,         # num x end position
    100,         # num y end position
    20,          # num thickness
    "#FFF",      # str color
    0.9          # num opacity (0 - 1)
);
2
3
4
5
6
7
8
9
Images
GAME.OVERLAY.drawImage(
    "28142",    # str texture asset id
    0,          # num x position
    0,          # num y position
    256,        # num width
    256,        # num height
    0,          # num rotation (0 - 360)
    0.9         # num opacity (1 - 0)
);
2
3
4
5
6
7
8
9
Arc
TIP
An arc is essentially a circle, but with more controll on where it starts and ends
# Draw half a circle
OVERLAY.arc(
    5,                  # num position x
    10,                 # num position y
    17,                 # num circle radius
    0,                  # num angle the circle starts
    Math.PI,            # num angle the circle ends
    true                # bool is counter clockwise
);
2
3
4
5
6
7
8
9
Arc clipping
Using arcTo, you can set boundaries to how far a circle flows until it collides between lines. For a better description check out CanvasRenderingContext2Dopen in new window documentation.
GAME.OVERLAY.arcTo(
    180,    # num x start position
    130,    # num y start position
    110,    # num x end position
    130,    # num y end position
    130     # num radius
);
2
3
4
5
6
7
Ellipse
GAME.OVERLAY.ellipse(
    20,     # num x position
    20,     # num y position
    20,     # num x radius
    20,     # num y radius
    90,     # num rotation angle
    20,     # num starting angle
    80,     # num ending angle
    false   # bool is counter clockwise
);
2
3
4
5
6
7
8
9
10
Curves
Curves draw from cursor to a point, but are influenced by a control point
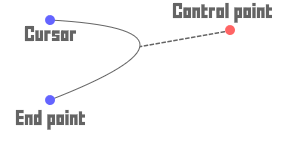
Quadratic curve
# Draw quadratic curve from cursor
OVERLAY.quadraticCurveTo(
    230         # num control point x position
    230         # num control point y position
    400         # num start point y position
    20          # num end point y position
);
2
3
4
5
6
7
Bezier curve
# Draw bezier curve from cursor
OVERLAY.bezierCurveTo(
    230         # num control point 1 x position
    230         # num control point 1 y position
    300         # num control point 2 x position
    400         # num control point 2 y position
    400         # num start point y position
    20          # num end point y position
);
2
3
4
5
6
7
8
9
Direct canvas drawing client-side
In javascript, you can draw on the canvas using the CanvasRenderingContext2D API. Krunkscript also allows you to do this, and works mostly the same.
To create one of these drawings, you first make a path by moving the cursor and pathing shapes. After that you "stroke" (draw) the path. These lines and shapes can be modified in several ways to fit your needs.
WARNING
- These features are not officially documented, there might be mistakes
- This part of the doc is not final
TIP
It's recommended to check out the CanvasRenderingContext2Dopen in new window documentation, as GAME.OVERLAY is a direct api for it.
Creating a basic line
# Starting the path
GAME.OVERLAY.beginPath();

# Move cursor to a position
GAME.OVERLAY.moveTo(50, 140);

# Draw line
GAME.OVERLAY.lineTo(150, 60);

# Closing the path
GAME.OVERLAY.closePath();

# Drawing out the path
GAME.OVERLAY.stroke();
2
3
4
5
6
7
8
9
10
11
12
13
14
Moving & drawing
# Move the cursor
GAME.OVERLAY.moveTo(
    50,     # num x position
    140     # num y position
);
2
3
4
5
# Set line width
GAME.OVERLAY.lineWidth(
    20       # num pixel width
);

# Set line dash width
GAME.OVERLAY.lineDashOffset(
    5        # num space between dashes on line
);

# Set corners where two lines meet
GAME.OVERLAY.lineJoin(
    "round"     #str type ("round", "bevel", "miter")
);

# Draw a line from cursor
GAME.OVERLAY.lineTo(
    150,     # num x position
    60       # num y position
);
2
3
4
5
6
7
8
9
10
11
12
13
14
15
16
17
18
19
20
Filling & filling style
You can fill a shape with a certain color.
# Set filling style
GAME.OVERLAY.fillStyle(
    "#FFF"  # str color
);

# Fill a path (before stroke)
GAME.OVERLAY.fill();
2
3
4
5
6
7
Stroke & stroke style
Stroke style is the color of stroke lines.
# Set stroke style
GAME.OVERLAY.strokeStyle(
    "#FFF"  # str color
);
2
3
4
# Start stroking a path
GAME.OVERLAY.stroke();

# Stroke text
OVERLAY.strokeText(
    "SwatDoge",     # str text to stroke out
    20,             # num x position
    10,             # num y position
    5               # num max width of stroke
);

# Stroke rectangle
OVERLAY.strokeRect(
    20,             # num x position
    10,             # num y position
    15,             # num width
    17              # num height
);
2
3
4
5
6
7
8
9
10
11
12
13
14
15
16
17
18
Transforming & translating paths
You can modify a paths properties using translation.
# Move path relative to itself
GAME.OVERLAY.translate(
    20,     # num x direction
    20      # num y direction
);
2
3
4
5
# Transform allows you to translate an object thru a matrix
GAME.OVERLAY.transform(
    1,      # horizontal scaling
    0,      # horizontal skewing
    1,      # vertical skewing
    1,      # vertical scaling
    0,      # horizontal moving
    0       # vertical moving
);
2
3
4
5
6
7
8
9
# Resets the current transform and reapplies using transform()
GAME.OVERLAY.setTransform(
    1,      # horizontal scaling
    0,      # horizontal skewing
    1,      # vertical skewing
    1,      # vertical scaling
    0,      # horizontal moving
    0       # vertical moving
);
2
3
4
5
6
7
8
9
Saving & restoring drawing styles
# Save a drawing state
GAME.OVERLAY.save();
2
# Rollback a drawing state
GAME.OVERLAY.restore();
2
Global draw opacity
Tags: alpha, transparency
# Set opacity of rendering context
GAME.OVERLAY.globalAlpha(
    1       # num (0-1) opacity
);
2
3
4
Scene
Skydome client-side
Tags: skybox
Skydomes are a group of settings that allow you to change the atmosphere of your level in certain areas.
# Set sky color (single color)
GAME.SCENE.setSkyColor(
    "#fff"      # str color
);
2
3
4
# Set skydome settings (gradient colors)
GAME.SCENE.setSkyDome(
    "#fff",     # str hex color 1
    "#fff",     # str hex color 2
    "#fff",     # str hex color 3
    {}          # obj additional data
);
2
3
4
5
6
7
# Additional data to change the skydome
obj additional = {
    texture: "27997",            # str asset id
    emissive: "#ff0000",         # str hex color
    emissiveTexture: "27998",    # str asset id
    textureMoveAxis: 0,          # str/num axis (0 - 1 OR "x" - "y")
    textureMoveSpeed: 0          # num speed (-20 - 20)
};
2
3
4
5
6
7
8
# Change fog settings
GAME.SCENE.setFog(
    "#fff",     # str color
    100         # num distance
);
2
3
4
5
# Get active zone
num activeZone = (num) GAME.CAMERA.envZone; # index or -1 if default
2
# Remove skydome
GAME.SCENE.removeSkyDome();
2
Scene lighting client-side
Lighting allows you to light up your scenes, adding atmosphere and detail to your map.
TIP
For better performance it is recommended to use "fake" lightingopen in new window
# Adjust the ingame sun
GAME.SCENE.setSkyLight(
    "#fff",     # str color
    2,          # num light intensity (0 - 3)
    20,         # num sun angle x (0 - 360)
    20,         # num sun angle y (0 - 360)
    100         # num light distance (10 - 15000)
);
2
3
4
5
6
7
8
# Adjust the ingame ambient light
GAME.SCENE.setAmbientLight(
    "#fff",     # str color
    2           # num light intensity (0 - 3)
);
2
3
4
5
Point light: (bulb, candle, flame etc.)
A pointlight is a light source that shines in every direction.
# Add a pointlight
obj lamp = GAME.SCENE.addPointLight(
    "#fff", # str color
    0,      # num x position
    0,      # num y position
    0,      # num z position
    50,     # num decay
    0.1,    # num intensity (0 - 1)
    false   # bool cast shadows
);
2
3
4
5
6
7
8
9
10
Directional light (sun)
Directional light is an infinitely far away light, which lights up the entire map.
# Add a directional light
obj sun = GAME.SCENE.addDirLight(
    "#fff", # str color
    0,      # num x direction
    0,      # num y direction
    0,      # num z direction
    10,     # num x target position
    10,     # num y target position
    10,     # num z target position
    false   # bool cast shadows
);
2
3
4
5
6
7
8
9
10
11
Spot Light (Flashlight, Projector etc.)
A spot light is a direct source of light, which shines on a precise point.
# Add a spotlight
obj flashlight = GAME.SCENE.addSpotLight(
    "#fff", # str color
    0,      # num x position
    20,     # num y position
    0,      # num z position
    10,     # num x target position
    10,     # num y target position
    10,     # num z target position
    50,     # num range
    0.1,    # num decay (0 - 1)
    0.9,    # num intensity (0 - 1)
    0,      # num angle (0 - 360)
    0,      # num penumbra
    false   # bool cast shadows
);
2
3
4
5
6
7
8
9
10
11
12
13
14
15
16
Rectangular area light (windows, screens etc.)
Simular to a spotlight, but square.
# Add a rectangular light
obj window = GAME.SCENE.addRectLight(
    "#fff",  # str color
    0,       # num x position
    0,       # num y position
    0,       # num z position
    1,       # num width
    1,       # num height
    1        # num intensity (0 - 1)
);
2
3
4
5
6
7
8
9
10
Geometry client-side
Tags: objects, primitives, shapes Krunker has a few default objects, like cubes, spheres and planes. These objects allow you to create maps or decorations, and can be managed with KrunkScript.
TIP
Geometry is client side, and it will thus not have any player collisions
Krunker object data
WARNING
- You can not change opacity of 3d models in krunker after you have spawned them
- Texture changing does not work on 3d models
- In update 5.4.2 most encodings were removed from krunker. Keep this in mind when using
textureEncoding - alwaysRender does not work
# All fields are optional
obj additional = {

    # Works on all object types:
    opacity: 0.5,                    # num opacity (0 - 1)
    emissive: "#ff0000",             # str color
    forceTransparency: false,        # bool transparency

    # Invert or double the faces of an object.
    side: 0,                         # num side (0: front-sided, 1 back-sided, 2: double-sided)
    doubleSided: false,              # bool double-sided
    frontSided: true,                # bool front-sided
    backSided: false,                # bool back-sided

    # Modify texture of an object.
    textureStretching: true,         # bool stretching
    textureScale: 0,                 # num scale (0 - 10)
    textureMoveAxis: 0,              # num axis (0, 1) (0: x, 1: y)
    textureMoveSpeed: -20,           # num move speed (-20 - 20)
    textureOffsetX: 0.1,             # num offset x (0 - 1)
    textureOffsetY: 0.1,             # num offset y (0 - 1)
    textureRotation: 180,            # num rotation (0 - 360)
    textureEncoding: 9,              # num (1) Linear, (2) sRGB, (3) Gamma, (4) RGBE, (5) LogLuv RGBM7, (6) RGBM16, (7) RGBD, (8) BasicDepthPacking, (9) RGBADepthPacking
    textureFrameCount: 0,            # num frame count (0 - 10)
    textureFrameDuration: 0,         # num frame duration (0 - 10)

    # Plane Only:
    mimicSprite: true,               # bool make plane act like a sprite.

    # Asset Only:
    textureSmoothing: true,          # bool smooth textures
    spinSpeed: -20,                  # num spinning speed (-20 - 20)
    spinAxis: 0,                     # num axis (0, 1) (0: x, 1: y)
    animSpeed: 1,                    # num animatino speed (0 - 10)
    animStart: "Idle",               # str starting animation name
    alwaysRender: true,              # bool always render
    alphaTest: 0                     # num alpha test (0 - 1)
};
2
3
4
5
6
7
8
9
10
11
12
13
14
15
16
17
18
19
20
21
22
23
24
25
26
27
28
29
30
31
32
33
34
35
36
37
38
Cube
# Add a cube to the scene.
obj cube = GAME.SCENE.addCube(
    "28000",    # str texture asset id
    "#fff",     # str color
    5,          # num x position
    0,          # num y position
    5,          # num z position
    10,         # num width
    10,         # num height
    10,         # num length
    {}          # obj additional data
);
2
3
4
5
6
7
8
9
10
11
12
GAME.SCENE.addSign(
    5,          # num x position
    0,          # num y position
    5,          # num z position
    10,         # num width
    10,         # num length
    "Wow!",     # str text
    {}          # obj additional data
);
2
3
4
5
6
7
8
9
Plane
# Add a plane to the scene.
obj plane = GAME.SCENE.addPlane(
    "28000",   # str texture asset id
    "#fff",    # str color
    5,         # num x position
    0,         # num y position
    5,         # num z position
    1,         # num width
    10,        # num length
    {}         # obj additional data
);
2
3
4
5
6
7
8
9
10
11
Sphere
Tags: ball
# Add a sphere to the scene.
obj sphere = GAME.SCENE.addSphere(
    "28000",   # str texture asset id
    "#fff",    # str color
    5,         # num x position
    0,         # num y position
    5,         # num z position
    8,         # num width
    4,         # num height
    10,        # num length
    {}         # obj additional data
);
2
3
4
5
6
7
8
9
10
11
12
Sprite
# Add a sprite to the scene.
obj sprite = GAME.SCENE.addSprite(
    "28000",    # str texture asset id
    "#fff",     # str color
    5,          # num x position
    0,          # num y position
    5,          # num z position
    8,          # num width
    4,          # num height
    10,         # num length
    {}          # obj additional data
);
2
3
4
5
6
7
8
9
10
11
12
3D model
Tags: asset, custom
TIP
Currently only .obj and .gltf are supported for 3d models
# Add an asset to the scene.
GAME.SCENE.addAsset(
    "236t",         # str 3d asset id
    5,              # num x position
    0,              # num y position
    5,              # num z position
    1,              # num scale
    "#fff",         # str color
    {},             # obj additional data
    onObjectLoad    # action() callback when asset loads. (function name is function used for callback)
);
2
3
4
5
6
7
8
9
10
11
Custom object
Custom objects allow you to create any shape you want using verticies:
WARNING
Textures do not work on addCustom verts
# Add a 3d model to the scene.
obj custom = GAME.SCENE.addCustom(
    "236t",         # str asset texture id
    "#fff",         # str color
    num[0, 0, 3],   # Float32Array of Vertices
    5,              # num x position
    0,              # num y position
    5,              # num z position
    6,              # num width
    2,              # num height
    10,             # num length
    {}              # obj additional data
);
2
3
4
5
6
7
8
9
10
11
12
13
Locally rotating 3D Objects
WARNING
Rotating objects locally seems to have some weird center offset issue
# Rotate object locally
object.rotateLocal(
    3,      # x rotation
    0,      # y rotation
    3       # z rotation
);
2
3
4
5
6
Listing 3D objects client-side
TIP
GAME.OBJECTS.list() only returns rotation, position, scaling and an id right now
# Get an obj[] of objects in a scene
GAME.SCENE.list();
2
Removing 3D objects client-side
# Create a cube reference
obj cube = GAME.SCENE.addCube("", "#fff", 0, 0, 0, 10, 10, 10, {
    opacity: 0.5
});

# Remove cube from the sence by reference
cube.delete();

# Remove all objects from scene
GAME.SCENE.clear();
2
3
4
5
6
7
8
9
10
Attaching/detaching 3D objects client-side
You can attach objects to entities or other objects.
# Create a cube reference
obj cube = GAME.SCENE.addCube("", "#fff", 0, 0, 0, 10, 10, 10, {
    opacity: 0.5
});

# Attach the cube to a camera
cube.attachTo(GAME.CAMERA.getObj(), 0, 0, 0);

# Attach the cube to another object
cube.attachTo(otherObj, 0, 0, 10);

# Attach the cube to a player
cube.attachTo(player, 0, 0, 0);

# Attach the cube to player but from current origin
cube.attachTo(player, 0, 0, 0, true);

# Detach cube
cube.detach();
2
3
4
5
6
7
8
9
10
11
12
13
14
15
16
17
18
19
Attach bones
WARNING
Punctionation such as . and , get stripped from bone names. This is an issue with Three.js, not with krunker, for more see this github discussionopen in new window
# Get "HandL" bone from 3D model
leftHand = (obj) dat.getBone("HandL");

# Attach cube to left hand bone
cube.attachTo(leftHand, 0, 0, 0);
2
3
4
5
Coordinate system
Coordinates in 2D and 3D space are represented as x, y and x, y, z:
# X: left-right
# Y: up-down
# Z: backward-forward
2
3
You can convert 3D coordinates into 2D ones:
# Get screen-space coords
obj coords2D = GAME.SCENE.posToScreen(0, 10, 0);
# Use coords to render to screen
(num) coords2D.x;
(num) coords2D.y;
# You can check if those coordinates or on the screen:
(bool) coords2D.onScreen;
2
3
4
5
6
7
Path nodes client-side
Path/Coordinate 3D objects that can be added by hand and interacted with using KrunkScript:
# Fetch list of nodes
obj[] nodes = GAME.OBJECTS.getPathNodes();

for (num i = 0; i < lengthOf nodes; i++) {
    (num) nodes[i].id;
    (num) nodes[i].x;
    (num) nodes[i].y;
    (num) nodes[i].z;
}
2
3
4
5
6
7
8
9
Moving, rotating & scaling client-side
Tags: translation, translating
# Create an object reference
obj cube = GAME.SCENE.addCube(
    "",     # str texture id
    "#fff", # str color
    0,      # num x position
    0,      # num y position
    0,      # num z position
    10,     # num width
    10,     # num height
    10      # num length
);

# Set object position
cube.move(0, 0, 0);

# Move object on x-axis
(num) cube.position.x += 1;
cube.position.x = 10;
GAME.SCENE.movObj(cube, 0, 1, 0);

# Scale object
cube.scale.x = 5;
GAME.SCENE.scaleObj(cube, 5, 1, 1);

# Rotate object
cube.rotate(0, 0, Math.PI);
cube.rotation.x = Math.PI;
GAME.SCENE.rotObj(cube, 0, 0, Math.PI);

# Face object towards coordinates.
cube.lookAt(0, 0, 0);
2
3
4
5
6
7
8
9
10
11
12
13
14
15
16
17
18
19
20
21
22
23
24
25
26
27
28
29
30
31
Object visibility client-side
Tags: invisible
You can hide or show krunker objects.
# Create an object reference
obj cube = GAME.SCENE.addCube("", "#fff", 0, 0, 0, 10, 10, 10);

# Make object invisible
cube.visible = false;
2
3
4
5
Scripting
Hooks client-side server-side
Hooks are functions called by javascript on the backend, and we overwrite them to include our own functionality.
start() client-side server-side
# Runs on every game start, thus after every round
public action start() {

}
2
3
4
update() client-side server-side
# Runs every tick, used for updating the world, players and AI
public action update(num delta) {
    # num delta     - time since last update in miliseconds
}
2
3
4
render() client-side
TIP
- Render is called AFTER update
- It's used for the 2d canvas
# Updates every tick, primarily used for updating the 2d canvas.
public action render(num delta) {
    # num delta     - time since last update in miliseconds
}
2
3
4
onPlayerSpawn() client-side server-side
# Runs when player spawns in
public action onPlayerSpawn(str id) {
    # str id        - player id
}
2
3
4
onPlayerUpdate() client-side server-side
Use this for overriding Krunker's default movement or for creating your own custom movement. Do not use it for updating game objects or making non-client-predicted movement.
# Runs when player updates, useful for custom movement
public action onPlayerUpdate(str id, num delta, obj inputs) {
    # str id        - player id
    # num delta     - time since last update in miliseconds
    # obj inputs    - input object
}
2
3
4
5
6
onPlayerDeath() client-side server-side
# Runs when player dies
public action onPlayerDeath(str id, str killerID) {
    #str id         - id of dead player
    #str killerID   - id of killer
}
2
3
4
5
onPlayerDamage() server-side
# Runs when player receives damage
public action onPlayerDamage(str id, str doerID, num amount) {
    #str id         - id of player who got damaged
    #str doerID     - id of player who dealt the damage
    #num amount     - amount of damage dealt
}
2
3
4
5
6
onPlayerLeave() server-side
WARNING
You can not access the player object after the player has left
# Runs when a player disconnects from the server
public action onPlayerLeave(str playerID) {
    #str playerID       - id of player that left
}
2
3
4
onGameEnd() server-side
# Runs when the game ends
public action onGameEnd() {

}
2
3
4
onChatMessage() server-side
# Runs when a player sends a chat message
public action onChatMessage(str msg, str playerID) {
    #str msg        - message
    #str playerID   - player send id
}
2
3
4
5
onServerClosed() server-side
# Runs when the server closes
public action onServerClosed() {

}
2
3
4
onAdFinished() server-side
# Runs when a player finished watching an ad
public action onAdFinished(str playerID, bool success) {
    # str playerID      - Player who finished watching
    # bool success      - Whether the ad played succesfully
}
2
3
4
5
Ads can be ran on the clientside using GAME.ADS.playVideo().
TIP
You can play a video every 5 minutes
GAME.ADS.playVideo();
Input hooks client-side server-side
See: Input hooks
Networking hooks server-side
See: Networking hooks
Trigger hooks server-side
See: Trigger hooks
UI hooks client-side
See: UI hooks
Default behavior client-side server-side
Krunkscript allows you to disable default game behaviour.
GAME.DEFAULT.disablePrediction();       # disable client prediction (client)
GAME.DEFAULT.disablePlayerBehaviour();  # disable player logic (client & server)
GAME.DEFAULT.disable3D();               # disable 3D Scene (client)
GAME.DEFAULT.disableServerSync();       # dont send player data (server)
GAME.INPUTS.disableDefault();           # dont send player inputs (client)
GAME.UI.hideDefault();                  # disables most default UI (client)
GAME.UI.hideCrosshair();                # disables crosshair (client)
GAME.PLAYERS.disableMeshes();           # hide player models (client)

player.defaultMovement = false;         # disables player movement (client & server)
player.defaultVelocity = false;         # disables player velocity (client & server)
player.defaultRotation = false;         # disables player rotations (client & server)
player.disableShooting = true;          # disables shooting & reloading (client & server)
player.disableMelee = true;             # disables melee (client & server)
player.disableDefault("jump");          # disables input behaviours (client & server)
2
3
4
5
6
7
8
9
10
11
12
13
14
15
Variables client-side server-side
Variables are used to store information.
# Create variable
num number = 1;             # number (int/float)
str text = "hello world";   # text (string)
bool val = true;            # boolean
2
3
4
Naming rules client-side server-side
WARNING
- Variables can't start with a number
- Variables can not use special charactes
- Variable names need to be unique
- Functions are also variables, and take up variable names
- Can't call variable names after existing krunker elements like GAME, lengthOf, notEmpty etc.
# Naming rules
num 0test = 0;      # invalid

num test = 0;       # valid
str _test = "hi";   # valid
num test0 = 0;      # valid
obj name = {};      # valid
2
3
4
5
6
7
Type conversion client-side server-side
Converting from one type to another.
num number = 1;             # create number
str text = (str) number;    # cast to string
str text = toStr number;    # convert number ("Deprecated" according to developers))
num newNum = toNum text;    # convert to string ("Deprecated" according to developers)

num test = toNum "0";       # valid ("Deprecated" according to developers)
num test2 = toNum "a";      # invalid: returns 0 ("Deprecated" according to developers)
2
3
4
5
6
7
Objects client-side server-side
Tags: dictionaries, hashmaps
WARNING
- Don't forget the ; after creating an object
- hasProp is undocumented, documentation on it might be flawed.
# Create a basic object
obj car = {
    name: "Toyota",
    x: 0
};

# Change or set properties
(num) car.x += 1;
car.y = 10;

# Checking an empty object
obj other = {};
if (notEmpty other) {
	# this condition would fail
}

# Check if property exists
hasProp car.name;   # returns true
hasProp car.wing;   # returns false
2
3
4
5
6
7
8
9
10
11
12
13
14
15
16
17
18
19
Arrays client-side server-side
Tags: lists, collections, fields, lengthof, size, length, push
Arrays are used to store several objects/values of the same type.
# Create array
str[] list = str["a", "b"];
obj[] list = obj[{a: 1}, {a: 5, b: 10}];

# Number array
num[] list = num[1, 2, 3, 4, 5];
num test = list[0] + list[1];

# Nested lists
num[][] nested = num[][num[1], num[1, 2]];

# Remove index from array
remove list[0]; # remove first item from list
remove list[i]; # remove specific index from list

# Get array length
lengthOf list;

# Add entry to array
addTo list 10;
2
3
4
5
6
7
8
9
10
11
12
13
14
15
16
17
18
19
20
Functions & actions client-side server-side
KrunkScript allows you to create custom actions (traditionally called functions). For example you could create an action that moves a car and depletes fuel from said car:
WARNING
Krunkscript has no function hoisting. Meaning you have to call a function after it is created.
# Create basic car object
obj car = {
    x: 0,           # x position
    speed: 0.1,     # cars speed value
    fuel: 100       # start with full tank
};

# Drive action
action drive(num delta) {
    if ((num) car.fuel > 0) {                               # car only moves while it has fuel
        car.x = (num) car.x + ((num) car.speed * delta);    # move car
        (num) car.fuel -= 0.1 * delta;                      # lose fuel
    };
}

# Game loop
public action update(num delta) {
    drive(delta);    # call custom action
}

# Return values
num action addFuel(num amount) {
    GAME.log("Added " + (str) amount);    # convert num to string
    return amount;
}

car.fuel = (num) car.fuel + addFuel(10);
2
3
4
5
6
7
8
9
10
11
12
13
14
15
16
17
18
19
20
21
22
23
24
25
26
27
Passing actions as arguments client-side server-side
TIP
In update v5.4.1 this was announced: "Action parameters are now option for all GAME sub actions". We are not sure what this means, but maybe you do
# Create function to pass as argument
str action word(str word){
    return "This is a word: " + word;
}

# Pass function as argument
action say(str action(str) funcArg){
    funcArg("Pizza");   # Outputs "This is a word: Pizza"
}
2
3
4
5
6
7
8
9
Debugging client-side server-side
Tags: Log, Println, Say Use the following functions to help you when debugging
GAME.log("Text");                           # logs text to the browser console
GAME.log(object);                           # logs object to console
GAME.log((str) number + "text");            # combine number with text

# You can cleanly chain variables together in a log like this:

GAME.log("test", "test2", 6, [0, 1, 2]);    # returns: test test2 6 [0, 1, 2]
2
3
4
5
6
7
Maths & calculations client-side server-side
num value = 1 + 1;          # addition
num value = 10 - 1;         # deduction
num value = 2 * 1.5;        # multiplication
num value = 2 ** 2;         # power of
num value = 2 / 1;          # division
num value = 10 % 5;         # modulo
value += 10;                # add to value
value++;                    # add 1 to value
value -= 5;                 # subtract from value
value--;                    # deduct 1 from value
num x = 3 << 1;             # bitshift left
num x = 3 >> 2;             # bitshift right
num x = 2 >>> 1;            # unsigned right shift bit operation
num value = 2 * (5 - 3);    # brackets
2
3
4
5
6
7
8
9
10
11
12
13
14
Basic math functions & utilities client-side server-side
Math.E                              # Euler's number
Math.PI                             # PI
Math.PI2                            # PIx2

Math.sin(num);                      # Sine
Math.sinh(num);                     # Hyperbolic Sine
Math.cos(num);                      # Cosine
Math.cosh(num);                     # Hyperbolic Cosine
Math.tan(num);                      # Tangent
Math.tanh(num);                     # Hyperbolic Tangent
Math.asin(num);                     # Arcsine
Math.asinh(num);                    # Hyperbolic arcsine
Math.acos(num);                     # Arccos
Math.acosh(num);                    # Hyperbolic Arccos
Math.atan(num);                     # Arctan
Math.atan2(num);                    # Arctan²
Math.atanh(num);                    # Hyperbolic Arctan

Math.log(num);                      # Logarithm
Math.exp(num);                      # Exponent
Math.pow(num, pow);                 # Power of

Math.round(num);                    # Round number
Math.floor(num);                    # Round down number
Math.ceil(num);                     # Round up number
Math.roundDecimal(num, decimals);   # Number reduced to certain decimals
Math.roundToNearest(num, near);     # Round number to nearest
Math.trunc(num);                    # Removes x amount of decimals

Math.abs(num);                      # Absolute number (non-negative)
Math.hypot(...args);                # Hypotenuse
Math.sqrt(num);                     # Square root
Math.min(num1, num2);               # Lowest of two values
Math.max(num1, num2);               # Highest of two values
Math.lerp(num1, num2, amnt);        # Interpolates between two values
Math.calcPerc(num, perc);           # Percent value of number

Math.toRad(num);                    # Converts degrees to radians
Math.toDeg(num);                    # Converts radians to degrees
2
3
4
5
6
7
8
9
10
11
12
13
14
15
16
17
18
19
20
21
22
23
24
25
26
27
28
29
30
31
32
33
34
35
36
37
38
39
Color conversions client-side server-side
# Convert Hue decimal to HEX color
UTILS.hexFromHue(
    0.2     # value between red and purple Hue (0 - 1)
);

# Convert RGB color to HEX
UTILS.RGBtoHEX(
    4,      # red value
    220,    # green value
    100     # blue value
);

# Convert HEX color to RGB
UTILS.HEXtoRGB(
    "#fff,  # str hex color
);
2
3
4
5
6
7
8
9
10
11
12
13
14
15
16
Random number generation client-side server-side
UTILS.randInt(x, y);     # random number between x and y
UTILS.randFloat(x, y);   # random float between x and y
2
Distance calculations client-side server-side
UTILS.getDist2D(x1, y1, x2, y2);         # distance between 2 points in 2D space
UTILS.getDist3D(x1, y1, z1, x2, y2, z2); # distance between 2 points in 3D space
2
Angle calculations client-side server-side
Tags: direction, vector
# 2D Angles
UTILS.anglDst(x, y);             # difference between 2 angles in radians
UTILS.getDir2D(x1, y1, x2, y2);  # direction between 2 points in radians

# 3D Angle
obj dirs = UTILS.getDir3D(x1, y1, z1, x2, y2, z1);   # directions between 2 points in radians
dirs.x;                                              # x direction
dirs.y;                                              # y direction
dirs.z;                                              # z direction
2
3
4
5
6
7
8
9
String manipulation & testing client-side server-side
You can use KrunkScript to manipulate strings in several ways.
TIP
Regex support has been confirmed by the developers, but it not yet available
Developer statement regarding UTILS.truncateTxt's random dots.
‟I think its for aesthetic purposes when text overflows, but could also be a bug„ ~ KPal, discord
# Create string
str testString = "Test";

str string2 = testString + "Me";                            # Combine strings
str string3 = UTILS.toUpper(testString);                    # Makes text uppercase (returns "TEST")
str string4 = UTILS.toLower(testString);                    # Makes text lowercase (returns "test")

UTILS.truncateTxt(
    "test",  #str input
    4,       #num point to start truncating from
    true,    #bool hide dots after string (?)
    1        #num index to start truncating backwards from
);

str string5 = UTILS.truncateTxt("123456", 2, true);         # Reduce text to first 2 characters (returns "12")
str string6 = UTILS.truncateTxt("123456", 2, false);        # results in: "12..."
str string7 = UTILS.replaceText("hello there", "the", "");  # results in: "hello re"
2
3
4
5
6
7
8
9
10
11
12
13
14
15
16
17
# Create string
str testString = "test";
if (UTILS.textContains(testString, "test")) {
	# Check if string contains certain value
}
2
3
4
5
You can also check certain properties of a string:
# Create string
str testString = "test";
if (UTILS.textContains(testString, "test")) {
	# Check if string contains certain value
}
2
3
4
5
Saving string to keyboard client-side
# Copies text to clipboard
UTILS.copyToClipboard("hello world");
2
Loops client-side server-side
# Create for loop
for (num i = 0; i < 10; i++) { # loop 10 times
	# more code here
}
2
3
4
# Create while loop
num test = 10;
while (test > 0) { # loop 10 times
	test--;
}
2
3
4
5
# Create object property loop
obj test = {x: 1, y: 4, z: 2};
for (obj prop in test) {
    GAME.log(number.key, number.value);  # x 1, y 4, z 2
}
2
3
4
5
# Iterate over array
str[] list = str["a", "b", "c"];
for (num i = 0; i < lengthOf list; i++) {
    GAME.log(list[i]); # log item in list
}
2
3
4
5
# You can break out of a loop (end loop entirely):
for (num i = 0; i < 10; i++) {
    if (i == 5) {
		break; # ends loop
	}
}
2
3
4
5
6
# You can also continue out of a loop (jump to next iteration):
for (num i = 0; i < 10; i++) {
    if (i == 5) {
        continue; # go to next iteration
    }
    GAME.log("Test " + toStr i);
}
2
3
4
5
6
7
Conditions & if statements client-side server-side
If statements allow you to run certain code only if a certain condition is met.
num value = 10;
if (value > 20) {
    GAME.log("Bigger than 20");
}
else {
    GAME.log("Less than or equal to 20");
}
2
3
4
5
6
7
# Condition operators

value > other   # greater than
value >= other  # greater than or the same
value < other   # less than
value <= other  # less than or the same
value == other  # same as
value != other  # not the same as

condition && condition  # multiple conditions must be met
condition || condition  # any condition is met

# You can also check if a value exists/is true
if (!!value) {

}

# Some examples
if ((10 < 5) || (5 == 10)) {
    # wont run
}

str test = "ab";
if (("a"+"b") == test && (1+1) == 2) {
    # will run
}

# Ternary operations
num = (true ? 1 : 0);
2
3
4
5
6
7
8
9
10
11
12
13
14
15
16
17
18
19
20
21
22
23
24
25
26
27
28
29
Trigger logic
Trigger events server-side
| ID | Event | Description |
|---|---|---|
| 0 | onShoot | When you shoot your trigger object, the trigger will execute. |
| 1 | onMelee | When you knife/melee your trigger object, the trigger action will execute. |
| 2 | onDamage | If you do damage to the trigger object in any way(shooting, knifing etc), the trigger action will execute. |
| 3 | onEnterObject | As soon as you enter the trigger object, the trigger action for it will execute. |
| 4 | onDestroy | As soon as the object gets destroyed, the trigger action will execute. You can set a health to your object so you know how much damage people will need to do to your object to destroy it. |
| 5 | onRespawn | Once the object respawns, the trigger action will execute. You can set a respawn timer for each object to control how fast it respawns and more. |
| 6 | onTimer | You can set a timer for your trigger object, once the timer runs out the trigger action will execute. |
| 7 | onProjectile | On the projectile you set, the trigger action will execute. |
| 8 | onThrowingMelee | On the event the melee is thrown, the trigger action will execute. |
| 9 | onPunch | If you punch the trigger object (with the fists of the character), the trigger action will execute. |
| 10 | onHoldMouse | If you punch the trigger object (with the fists of the character), the trigger action will execute. |
| 11 | onCollision | On the collision, the trigger action will execute. |
| 12 | onStorageEquals | When the storage equals a specific value, the trigger action will execute. |
| 13 | onStorageGreater | When the storage is greater than a specific value, the trigger action will execute. |
| 14 | onStorageLesser | When the storage is lesser than a specific value, the trigger action will execute. |
| 15 | onAIDeath | On the death of the AI, the trigger will execute. |
| 16 | onInteractKey | When the player presses the interact key, the trigger will execute. You can use this for many things, when you press the interact key you can give your players a reward etc. |
| 17 | onPlayerSpawn | When the player spawns in the game, the trigger action will execute. |
| 18 | onPlayerKill | When the player gets a kill, the trigger action will execute. |
| 19 | onPlayerDie | When the player dies, the trigger action will execute. |
| 20 | onAIDamage | When the AI damage occurs, the trigger action will execute. |
| 21 | onNukeStart | As soon as the nuke starts, the trigger action will execute. |
| 22 | onNukeEnd | As soon as the nuke ends, the trigger action will execute. |
| 23 | onExitObject | When you exit the object, the trigger action executes. |
| 24 | onCustomValEquals | When the specific custom value equals a specific value, the trigger action will execute. |
| 25 | onCustomValLesser | When the specific custom value is less than a specific value, the trigger action will execute. |
| 26 | onGameStart | As soon as the game starts, the trigger action will execute. |
| 27 | onObjectiveSwitch | When the objective switches (Objectives like Hardpoint), the trigger action will execute. |
| 28 | onPlayerDamage | The trigger action will execute you on the player damage. |
| 29 | N/A | - |
| 30 | onCustomValGreater | When the specific custom value is greater than a specific value, the trigger action will execute. |
Trigger conditions server-side
| ID | Condition | Description |
|---|---|---|
| 0 | None | No conditions are needed to be met for the action to be executed. |
| 1 | Player Value | Requires a specific player value (you can set the player value using triggers) for the action to be executed. |
| 2 | Current Class | Requires the person to be on a certain class you decide for the action to properly execute. |
| 3 | Trigger Value | Requires the trigger value to be a certain amount for the trigger to be executed. |
| 4 | Player Count | Requires players to have a cerian player count number (You can set player count with triggers). |
| 5 | Global Value | Requires players to have a cerian global count number (You can set global count with triggers). |
| 6 | Player has Account | Requires player to have a registered Krunker account. |
| 7 | Player has Premium | Requires player to be subscribed to Krunker Premium. |
| 8 | Player is Verified | Requires player to have verification status in-game. |
| 9 | Player is Partner | Requires player to have partner status in-game. |
Trigger actions server-side
| ID | Action | Description |
|---|---|---|
| 0 | Give Player Score | Gives player an amount of score that you choose. For example, when someone hits a block, they can get rewarded 25 points. |
| 1 | Kill Player | Kills the player as soon as the trigger action is executed. |
| 2 | Respawn Player | Respawns the player once the trigger action is executed. |
| 3 | Change Player Health | Adjusts the players health. |
| 4 | Destroy Interface | As soon as this trigger is executed, the interface you set will be destroyed. |
| 5 | Toggle Interface Gate | The interface gate is toggled as soon as the trigger is executed. |
| 6 | Change Interface Health | The interfaces health changes when the trigger is executed. |
| 7 | Teleport Player To Interface | Once the trigger is executed, the player is teleported to the interface you set with an ID. |
| 8 | Change Interface Deposit Box Amount | Changes the value of the interface deposit box amount. |
| 9 | Kill Opposing Team | Kills all of the players on the opposing team. Example of this would be a buyable tactic in a TDM game, where you can wipe out the entirety of the other team. |
| 10 | Respawn Opposing Team | Respawns all of the people on the opposing team. |
| 11 | Respawn Destructible Interface | Respawns the destructible interface. |
| 12 | Toggle Destructible Interface | Toggles the destructible interface. |
| 13 | Set Player Score | Once the trigger is executed, the score you set will be applied to the player. For example, if you fall of the map and hit a trigger box, your score can be set to 0. |
| 14 | Broadcast Sound | Sends a sound to the entire map, so everyone playing can hear. |
| 15 | Clear Player Loadout | Once the trigger is executed, the player's loadout is cleared. This can be used in something like a battle royale map for clearing someone's loadout if they make a fatal mistake. |
| 16 | Broadcast Message | once the trigger action is executed a message will broadcast a message to the entire lobby so everyone can see. This could be used in a game where players work together to accomplish something, and messages are broadcast when the entire lobby accomplishes something. |
| 17 | Send Message | Once this trigger action is executed, a message will be broadcasted only to the player to see. |
| 18 | Swap Player Team | Once this trigger is executed, the players team is swapped to the opposing team. |
| 19 | Set Player Team | This trigger is used to set the players team. This would be good in a zombies map where you can set someone to be either a zombie or human at the start. |
| 20 | Round Time | This trigger action allows you to set the round time. |
| 21 | Reset Interface | This trigger action completely resets the interface you set. |
| 22 | End Round | This trigger action ends the round of your lobby. This can be used for many things, such as a race mode where you can end the round of the lobby once a player crosses a certain point. |
| 23 | Refill Player Knife | This will refill the player's knife. For example if you throw your knife and you have no more knives to throw, you can hit the trigger and the player's knife will be refilled back to what it originally was. |
| 24 | Destroy Self | Once this trigger action is executed, the trigger will destruct itself. |
| 25 | Increase Interface Storage | This trigger action increases the interface storage by the amount you set. |
| 26 | Decrease Interface Storage | This trigger action decreases the interface storage by the amount you set. |
| 27 | Set Interface Storage | This trigger action sets the interface storage by the amount you set. |
| 28 | Reset Interface Storage | This trigger action completely resets the interface storage. |
| 29 | Broadcast Popup | Once this trigger is executed, a popup is sent to the entire lobby for everyone playing the game to see. |
| 30 | Send Popup | Once this trigger is executed, a popup is just sent to the specific player only. |
| 31 | Jump Scare | If you would like to scare the people that play your map at a certain point, use this trigger. |
| 32 | Reward KR | If you ever wanted to reward users KR from your map, use this trigger. You will need KR in your maps bank first, then use this trigger and depending on the action you set for this to be triggered, it will give the user the amount of KR you decide. |
| 33 | Clear Player Checkpoints | This trigger action clears all of the players checkpoints. This would be useful in Parkour maps if you want to add a place for someone to restart the entire map without checkpoints. |
| 34 | Send Sound | This trigger sends a sound throughout the entire map, you can change the sound that is sent in the editor panel. |
| 35 | Explosion | When this trigger is put in, an explosion will occur. This would be good if you wanted something like an oil tank and when the player shoots it, it explodes. |
| 36 | Spawn AI | This trigger will spawn AI/Bots in your map, you would first need to create AI objects in the AI panel for this to work. |
| 37 | Set Player Value | This trigger action sets the value number for the player to the specific number you enter. |
| 38 | Inc/Dec Player Value | This trigger action will specifically increase or decrease the player value by the amount you set when the action is executed. |
| 39 | Play Animation | Plays a specific animation when the trigger is executed. For example, you can make a nuke animation that only animates once the player Nukes. |
| 40 | Teleport Player to Path Node | This trigger action teleports the player to the path node that you have set. |
| 41 | Teleport Destructible Interface to Path Node | This trigger action teleports the descructible interface to the path node that you have set. |
| 42 | Reset Destructible Interface Position | Resets the position of the destructible interface position. |
| 43 | Set Interface Trigger Value | Once the trigger is executed, the interface trigger value will be set to the value you put in. |
| 44 | Inc/Dec Interface Trigger Value | Once the trigger is executed, the interface trigger value will be either increased or decreased depending on what you put in. |
| 45 | Set Trigger Value (Self) | Once the trigger is executed, the interface trigger value will be set to the value you put in for yourself. |
| 46 | Inc/Dec Trigger Value (Self) | Once the trigger is executed, the interface trigger value will be either increased or decreased depending on what you put in for yourself. |
| 47 | Change Class | Changes the persons class once the trigger action is executed. |
| 48 | Set Interface Deposit Box Amount | Sets the value of the interface deposit box amount once the trigger action is executed. |
| 49 | Save Data | Saves the data once the trigger action is executed. |
| 50 | Change Primary Weapon | Changes the primary weapon of the player (This is the primary weapon, not the secondary or melee). |
| 51 | Change Secondary Weapon | Changes the Secondary weapon of the player (This is the secondary weapon, not the primary or melee). |
| 52 | Set Global Value | You can set the global value to a specific number. Global value is displayed to the entire lobby. |
| 53 | Change Global Value | This trigger action changes the Global value. Global values are displayed to the entire lobby. |
| 54 | Stop Sound | Stops the specific sound by the ID you set in Action value. |
| 55 | Show/Hide GUI Element (All) | This will show or hide a specific GUI element once the trigger action is executed for the entire lobby (so the UI changes for everyone). You have to set the GUI element a ID, then put that same ID for the trigger to specifically target the GUI element you want. |
| 56 | Show/Hide GUI Element (Player) | Once this trigger action is executed, the GUI element is either shown or hidden just for the specific player that the trigger applied too. |
| 57 | Load Data | Loads the data when the trigger action is executed. |
| 58 | Custom Action | Executes a custom action once the trigger action is executed. |
| 59 | Change Ambient Sound | Changes the game's ambient sound when action is executed. |
| 60 | Play Animation (Self) | Plays a custom animation for itself on execution (styling must use a .gltf custom asset). |
| 61 | Give Effect | Gives the player a selected Effect upon execution. |
| 62 | Give Random Effect | Gives the player a randomized Effect upon execution. |
| 63 | Play Video Ad | Plays a full-screen video ad on execution (can only be called every 5 mins). |
Triggers with KrunkScript ???
WARNING
This part of the documentation seems malformed with no statement made by the developers yet, it is best to ignore this.
Developer statement on this action
“if its on docs.krunker.io just send a PR to fix it„ ~ KPal, discord
custom action 58):(
    # str playerID           - player id
    # str customParam        - custom trigger parameter
    # num value              - custom trigger value
)
2
3
4
5
Trigger hook server-side
# Runs when trigger triggers "custom action" action
public action onCustomTrigger(str playerID, str customParam, num value) {
    # str playerID           - player id
    # str customParam        - custom trigger parameter
    # num value              - custom trigger value
}
2
3
4
5
6
Unimplemented features
Krunker offers some features we do not yet know more about. These are up and coming or deprecated features.
Voxel ???
Krunker offers two methods for a future voxel gamemode, speculated to be a survival minecraft style game.
# Destroy voxel
GAME.VOXEL.destroy(
    4,      # num voxel id
);
2
3
4
# Place voxel
GAME.VOXEL.place(
    4,          # num x position
    4,          # num y position
    4,          # num z position
    ???,        # ??? type of block
    {}          # obj additional data
);
2
3
4
5
6
7
8
NFT ???
Developer statement on NFT methods
‟Added Basic NFT functions: hasWallet, ownedAssets (check docs)„ ~ Krunker development team, patchnotes. It was never added to the docs.
obj player = GAME.PLAYERS.getSelf();

# Check if player owns certain assets
GAME.NFT.ownedAssets(
    player.id,      #str player id
    ???             #??? collection
    callback        #action(???) callback
);

# Check if player  has a crypto wallet
GAME.NFT.hasWallet(
    player.id       #str player id
);
2
3
4
5
6
7
8
9
10
11
12
13
Config ???
GAME.CONFIG.getClasses();           # Get objects with class information
GAME.CONFIG.getMatch();             # Get objects with match information
GAME.CONFIG.getSettings();          # Get objects with settings information
GAME.CONFIG.getWeapons();           # Get objects with weapon information
2
3
4
Delay ???
WARNING
This feature was removed from autocomplete
# Delay a script execution
GAME.UTILS.delay(
    afterDelay        # action(???) callback when delay has passed
    200               # num time in miliseconds
);
2
3
4
5
Raycast ???
Developer statement on Raycast methods
‟Added raycast support (WIP - check docs)„ ~ Krunker development team, patchnotes. It was never added to the docs.
# Raycast from point in space (returns void)
GAME.RAYCAST.from(
    0,                # num x position
    0,                # num y position
    0,                # num z position
    5,                # num radian x direction
    5,                # num radian y direction
    200               # num distance of ray
);
2
3
4
5
6
7
8
9
# Get player object
obj player = GAME.PLAYERS.getSelf();

# Raycast from player (returns void)
GAME.RAYCAST.fromPlayer(
    player,           # obj player reference
    200               # num distance
);
2
3
4
5
6
7
8
Player LOD ???
A dead feature to change LOD of players, likely created for 7fi's & Ocotodools spacesim project.
GAME.PLAYERS.toggleLOD(
    1       #num value
);
2
3
Execute trigger server-side
GAME.TRIGGERS.execute(num ID, ??? args){
    #???
}
2
3
Object morphing client-side
Tags: Morph targets, Shape keys
You can interpolate between morphstates on a 3d model. Does not work.
    object.updateMorph(
        "Comedy",       # str morph target/Shape key
        0.2             # num value (0 - 1)
    );
2
3
4
Fixed delta client-side server-side
TIP
You can get fixed delta regularly by deviding the last GAME.TIME.now() by the current one.
Suposed to give delta non dependent on game speed on the client side. Currently gives regular delta. Server side is not affected by game speed.
GAME.TIME.fixedDelta();
Payment server-side
Suposed to allow scripters to give and charge players for KR. Unimplemented.
    GAME.PAYMENTS.charge(
        # ???
    );

    GAME.PAYMENTS.giveKR(
        player.id,          # str player id
        5                   # num kr value to give
    );
2
3
4
5
6
7
8
Libraries client-side server-side
Allows for importing external tooling for krunkscript. Not enough is known about the implementation of this yet.
User interface
Adding an element/div client-side
You can add your own UI elements to krunker using KrunkScript. If needed, you can disable the default krunker UI.
# Create a div (and get its str id)
# Specifying the parent div will make the div a child of that parent
str id = GAME.UI.addDIV(
    "minimap",                       # str id of div
    true,                            # bool is shown (display: none)
    "width: 10px; height: 10px",     # str CSS styling as string
	"gameUI"                         # str parent div id (default: "customGUIHolder")
);
2
3
4
5
6
7
8
Changing div properties
# Update div style property
GAME.UI.updateDIV(
    "minimap",              # str id of div
    "background-color",     # str property
    "red"                   # str value
);
2
3
4
5
6
Getting div properties
# Get property of div, returns str css value
    GAME.UI.getProp(
        "minimap"           # str id of div
        "background-color"  # property to get value of
    );
2
3
4
5
Changing div text
# Update div text
GAME.UI.updateDIVText(
    "minimap",      # str id of div
    "hello world"   # str text
);
2
3
4
5
Get div text
# Get div text
GAME.UI.getDIVText(
    "book"      # str id of div
);
2
3
4
Moving the div
Tags: clone
# Create element
GAME.UI.addDIV("sott_test", true, "");

# Move element to a different parent
GAME.UI.moveDIV(
    "sott_test",            # Current child id
    "gameUI",               # New parent to move to
    "sott_test_2"           # New child id
);
2
3
4
5
6
7
8
9
Removing the div
# Remove the div
GAME.UI.removeDIV(
    "minimap"       #str id of div
);
2
3
4
Onclick event listener
# Runs when div is clicked
public action onDIVClicked(str id) {
    if (id == "minimap") {
        # do something
    };
}
2
3
4
5
6
Changing document title
# Set document title to string
GAME.setTitle(
    "My krunker map"    #str document name
);
2
3
4
Image element client-side
Tags: img
# Add image element
str id = GAME.UI.addImage(
    "39190",                        # str image asset id
    "image",                        # str element id
    true,                           # bool is shown (display: none)
    "width: 10px; height: 10px"     # str CSS styling as string
    "gameUI"                        # str parent div id (default: "customGUIHolder")
);
2
3
4
5
6
7
8
Custom CSS & phone compatability client-side
Using pure css, you can create phone compatable UI's. For more on mods check out Mod/Resource packs
You can detect and adjust UI to phones using some of the following code:
/* Hide by div id on mobile*/
#uiBase .isMobile #div_id {
    display: none;
}

/* Hide div based on screensize */
@media only screen and (max-width: 600px) {
    #div_id {
        display: none;
    }
}
2
3
4
5
6
7
8
9
10
11
Mobile specific elements client-side
Some elements are specific to mobile and can be edited and repositioned with CSS. Here is a list of the Mobile specific elements available by default:
#mobileJoystick{}     /*Joystick to move with*/
#mobileJump{}         /*Jump button*/
#mobileCrouch{}       /*Crouch button*/
#mobileEsc{}          /*Return to menu button*/
#mobileShoot{}        /*Shoot button*/
#mobileAimShoot{}     /*Button to aim & shoot at the same time*/
#mobileScope{}        /*Aim down sight button*/
#mobileReload{}       /*Reload button*/
#mobileSwap{}         /*Button to swap between primary and secondary*/
#mobileKSwap{}        /*Button to swap between knife and primary*/
2
3
4
5
6
7
8
9
10